
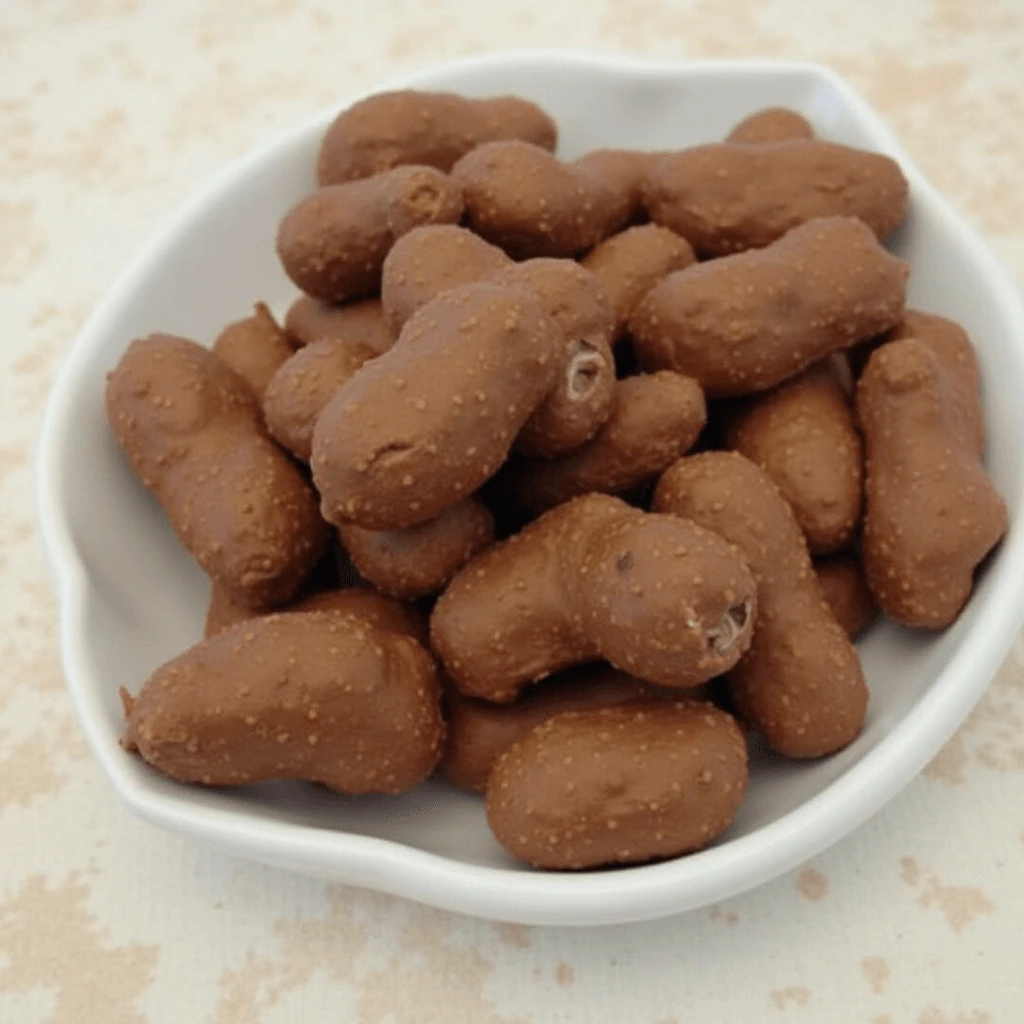
Is there anything more delightful than the combination of creamy chocolate and crunchy peanuts? Chocolate-covered peanuts are the ultimate sweet-and-salty snack, perfect for indulging in a moment of bliss or sharing with friends and family. Whether you’re preparing treats for a party, gifting something homemade, or just craving a quick dessert, this recipe has you covered.
Making chocolate-covered peanuts at home isn’t just easy—it’s also a fun and rewarding experience. By crafting these delicious morsels yourself, you can control the ingredients, customize the flavors, and enjoy the satisfaction of creating something truly special. In this guide, we’ll walk you through every step of the process, share tips for perfecting your technique, and even explore creative variations to make these treats uniquely yours.
Let’s get started and turn your kitchen into a haven for sweet, nutty goodness!
Why Chocolate Covered Peanuts Are the Perfect Sweet and Salty Snack
Chocolate-covered peanuts have an undeniable charm that makes them a favorite treat for snack lovers of all ages. Let’s explore why these delightful bites deserve a special place in your snack lineup.
A Perfect Balance of Flavors
The combination of sweet and salty flavors is a classic pairing that never fails to please the palate. The rich, creamy sweetness of chocolate contrasts beautifully with the salty crunch of roasted peanuts, creating a harmonious blend that’s irresistibly satisfying. It’s this balance that makes chocolate-covered peanuts a crowd-pleaser for any occasion.
Versatile Snack for Any Occasion
Chocolate-covered peanuts are incredibly versatile, making them ideal for various occasions. Need a quick and easy treat for a party? They’re perfect as a standalone snack or part of a dessert table. Need a little pep in your step as the day rolls on? Their protein-packed peanuts and indulgent chocolate coating provide just the right mix of nutrients and satisfaction. From holiday gifts to movie nights, these snacks fit the bill every time.
A Healthier Homemade Alternative
When made at home, chocolate-covered peanuts can be a healthier option compared to store-bought varieties. You have complete control over the ingredients, allowing you to use high-quality chocolate, natural peanuts, and just the right amount of sweetness. For those looking to reduce added sugars or avoid preservatives, this DIY approach is a delicious way to indulge without compromising on quality.
Customizable to Your Preferences
One of the best things about chocolate-covered peanuts is how easily you can customize them to suit your taste. Prefer dark chocolate for a richer flavor? Go for it! Love a bit of crunch? Add a sprinkle of sea salt or crushed pretzels. The possibilities are endless, and experimenting with flavors and toppings allows you to create a snack that’s uniquely yours.
Chocolate-covered peanuts are more than just a snack—they’re a perfect combination of flavors, textures, and versatility. Whether you’re treating yourself or sharing them with loved ones, these little bites of joy never disappoint.
Essential Ingredients and Tools for Making Chocolate Covered Peanuts
Making chocolate-covered peanuts at home requires only a handful of simple ingredients and basic kitchen tools, but the results are nothing short of spectacular. Let’s break down what you’ll need to ensure your homemade snack turns out perfectly every time.
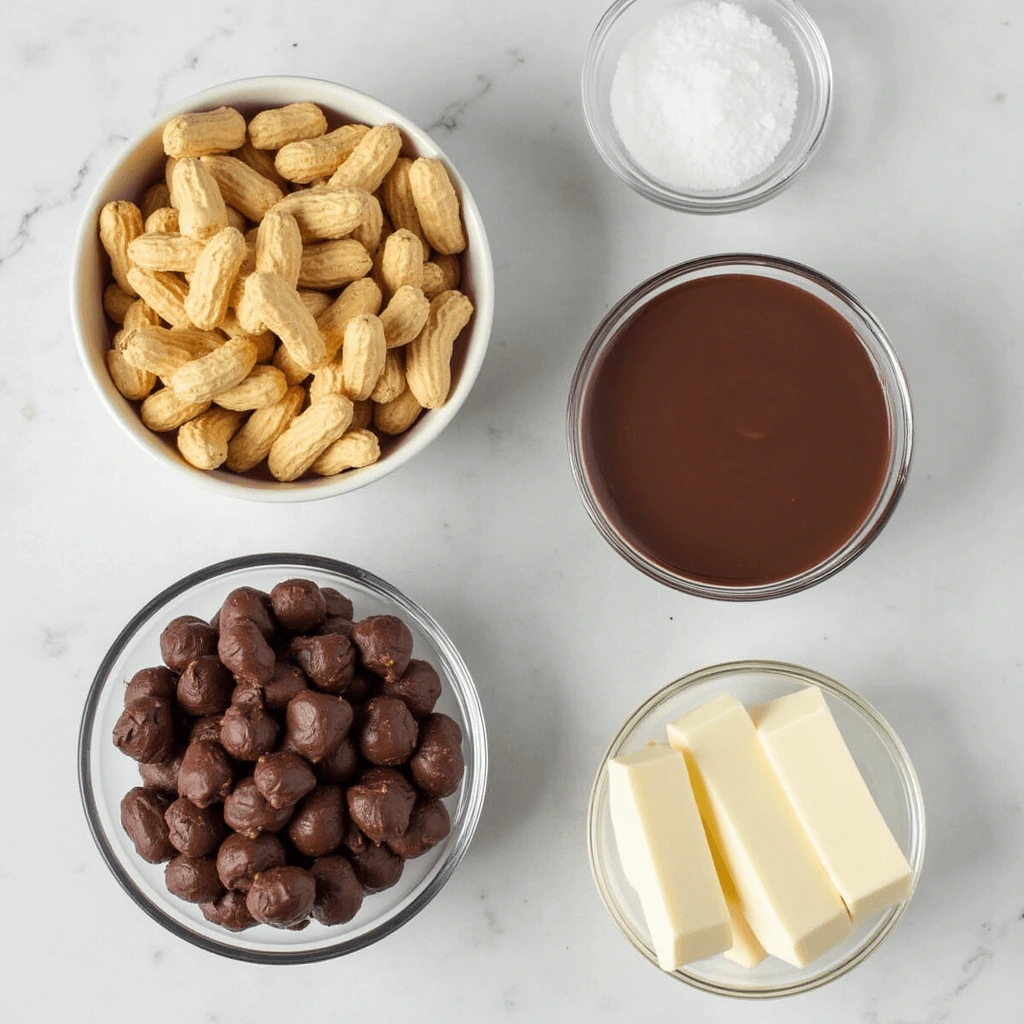
Key Ingredients You’ll Need to make Chocolate Covered Peanuts
- Peanuts:
The star of the show! Use roasted peanuts for a rich, nutty flavor. You can opt for salted peanuts to enhance the sweet-and-salty contrast or unsalted peanuts if you prefer to control the saltiness. For an extra crunchy texture, lightly toast raw peanuts before coating them in chocolate. - Chocolate:
High-quality chocolate is essential for achieving a smooth, glossy coating. Choose from:- Milk chocolate for a creamy and sweet flavor.
- Dark chocolate to unleash a deep, zesty kick.
- White chocolate for a sweeter, milder option.
Consider using chocolate chips, baking chocolate, or couverture chocolate for the best results.
- Optional Add-ins:
- Sea salt: A sprinkle of flaky sea salt can elevate the sweet-and-salty balance.
- Sprinkles or crushed nuts: Add a fun and decorative touch.
- Spices or flavorings: Cinnamon, chili powder, or vanilla extract can add a unique twist.
Essential Tools for Success
- Double Boiler or Microwave-Safe Bowl:
A double boiler ensures that the chocolate melts gently without burning. If using a microwave, melt the chocolate in short bursts (15-20 seconds), stirring between each interval to achieve a silky texture. - Baking Sheet and Parchment Paper:
A baking sheet lined with parchment paper is vital for setting the chocolate-covered peanuts. It keeps those peanuts from clinging together and turns cleanup into a snap! - Forks or Tongs:
Use a fork or small tongs to dip the peanuts into the melted chocolate, ensuring even coating while allowing excess chocolate to drip off before placing them on the baking sheet. - Spatula or Mixing Spoon:
These are handy for stirring the chocolate as it melts and keeping it smooth and lump-free.
Optional Tools for Enhanced Presentation
- Candy Thermometer:
If you’re using tempered chocolate for a shiny, professional finish, a candy thermometer can help you monitor the temperature accurately. - Piping Bag or Ziplock Bag:
For a creative touch, drizzle extra chocolate over the coated peanuts using a piping bag or a ziplock bag with a small corner cut off.
The Importance of Quality Ingredients and Tools in Chocolate Covered Peanuts recipe
Using the right ingredients and tools not only simplifies the process but also ensures your chocolate-covered peanuts taste amazing and look professional. High-quality chocolate and fresh peanuts will enhance the flavor, while the proper tools make the task easier and more enjoyable.
By gathering these essential ingredients and tools, you’ll be well-prepared to whip up a batch of irresistible chocolate-covered peanuts in no time!
Step-by-Step Guide to Making Homemade Chocolate Covered Peanuts
Making chocolate-covered peanuts at home is easier than you might think! With the right approach and a few simple steps, you can create a delicious treat that looks and tastes like it came from a gourmet candy shop. Let’s dive into Luna’s easy-peasy roadmap to peanut perfection!
Step 1 – Step 1 – Round Up and Prep Your Goodies
Before you begin, ensure you have everything you need:
- Measure out your peanuts. Roasted peanuts are ideal for their deep, nutty flavor. If using raw peanuts, lightly toast them in the oven at 350°F (175°C) for 10 minutes to enhance their flavor and crunch, Craving that perfect peanut crunch? Check out WikiHow’s roasting tips to get those nuts ready for Luna’s chocolate magic!
- Choose your chocolate. For the best results, use high-quality chocolate like baking chocolate or couverture chocolate. Decide whether you want milk, dark, or white chocolate, depending on your flavor preference.
Step 2 – Melt the Chocolate
Achieving the perfect chocolate coating starts with properly melted chocolate. Pick your fave from these melting tricks:
- Double Boiler Method:
- Fill the bottom pot with an inch of water and bring it to a simmer.
- Place a heatproof bowl over the pot, ensuring it doesn’t touch the water.
- Add the chocolate to the bowl and stir constantly until smooth and fully melted.
- Microwave Method:
- Place the chocolate in a microwave-safe bowl.
- Heat in 15-20 second intervals, stirring in between to prevent overheating.
- Stop heating once the chocolate is smooth and glossy.
For a glossy finish, add a teaspoon of coconut oil or cocoa butter to the melted chocolate and stir well.
Want your chocolate-covered peanuts to shine like Luna’s finest? Peek at Allrecipes’ tempering tricks and take your treat game to the next level!
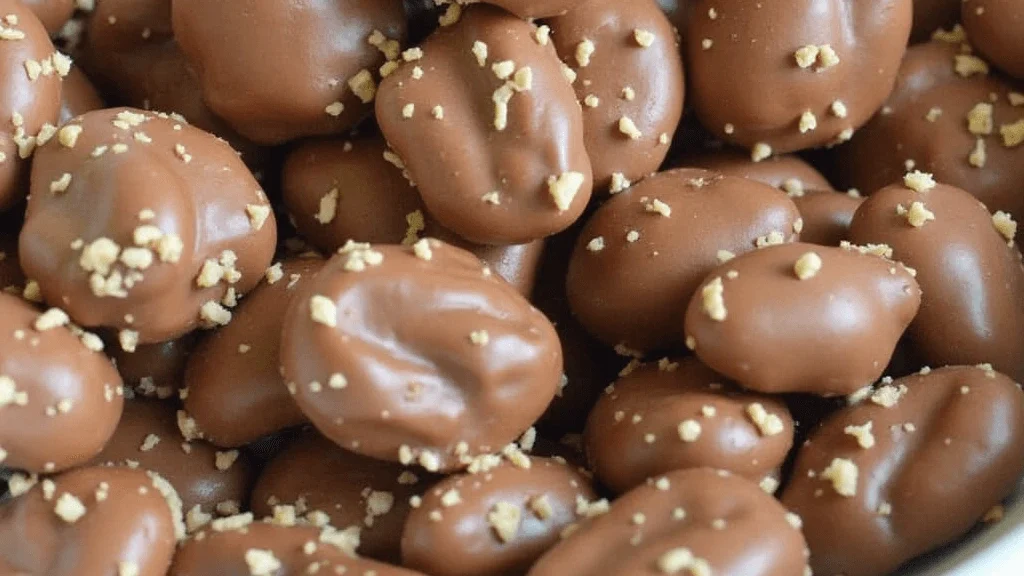
Step 3 – Coat the Peanuts in Chocolate
- Add a handful of peanuts to the melted chocolate, ensuring each one is fully coated.
- Use a fork, slotted spoon, or small tongs to lift the peanuts out of the chocolate. Let the excess chocolate drip off before placing them on a prepared baking sheet lined with parchment paper.
- Work in small batches to prevent the chocolate from hardening while you’re coating the peanuts.
Step 4 – Add Toppings (Optional)
If you want to customize your chocolate-covered peanuts, now’s the time to get creative:
- Sprinkle a pinch of flaky sea salt over the peanuts for a gourmet touch.
- Add colorful sprinkles for a fun and festive look.
- Drizzle extra chocolate (white or dark) over the coated peanuts for a decorative finish.
Step 5 – Let the Chocolate Set
- Place the baking sheet with the coated peanuts in the refrigerator for 20-30 minutes, or until the chocolate is fully hardened.
- For a room-temperature option, allow the chocolate to set naturally in a cool, dry place, which may take slightly longer.
Step 6 – Store and Enjoy
- Once the chocolate has hardened, transfer your chocolate-covered peanuts to an airtight container. Store them at room temperature for up to a week or in the refrigerator for up to two weeks.
- Enjoy them as a snack, dessert topping, or gift them to friends and family in decorative packaging!
Pro Tips for Perfect Chocolate Covered Peanuts Results
- Work quickly when coating the peanuts to prevent the chocolate from seizing.
- Keep your workspace and tools dry; even a drop of water can cause the chocolate to clump.
- Experiment with different chocolates, nuts, and toppings to create unique variations.
Bonus Step – Bless the Recipe with Love and Peace and Goodness
Before serving, take a moment to sprinkle a little love and gratitude into your dish. Remember, the best recipes are made with care and joy!
By following these steps, you’ll master the art of making homemade chocolate-covered peanuts and have a delicious treat to enjoy anytime!
Creative Variations for Chocolate Covered Peanuts
Chocolate-covered peanuts are a versatile treat, and with a little creativity, you can turn this classic snack into something truly unique. Here are some fun and flavorful variations to try, each offering a delightful twist on the traditional recipe.
Experimenting with Different Chocolates
- Dark Chocolate Peanuts:
For those who love a rich, slightly bitter flavor, coat your peanuts in dark chocolate. Look for chocolate with at least 70% cocoa for a deeper taste and antioxidant benefits. - White Chocolate Peanuts:
White chocolate adds a creamy, sweet twist that pairs beautifully with the salty crunch of peanuts. Enhance it with a drizzle of dark chocolate for contrast. - Milk Chocolate and Caramel:
Combine milk chocolate with a caramel drizzle or coating for a decadent flavor reminiscent of a candy bar.
Adding Flavorful Toppings
Elevate the flavor and presentation of your chocolate-covered peanuts with toppings:
- Sea Salt: A light sprinkle of sea salt enhances the sweet-and-salty balance and adds a gourmet touch.
- Crushed Nuts: Double the crunch by rolling the coated peanuts in crushed almonds, pecans, or pistachios.
- Spices: Add a dash of cinnamon, nutmeg, or chili powder to the melted chocolate for a warm or spicy kick.
- Candy Coatings: Use colorful sprinkles, edible glitter, or mini chocolate chips for a festive look, perfect for holidays or special occasions.
Mix-Ins for Texture and Flavor
Incorporate mix-ins for added texture and complexity:
- Dried Fruits: Add raisins, dried cranberries, or chopped apricots for a chewy contrast to the crunchy peanuts.
- Pretzel Pieces: Crushed pretzels provide a salty, crispy element that complements the chocolate and peanuts.
- Toasted Coconut Flakes: Roll the coated peanuts in toasted coconut for a tropical flair.
Fun Shapes and Clusters
- Peanut Clusters: Instead of coating individual peanuts, mix several peanuts into the melted chocolate and scoop them onto parchment paper to form clusters. This method creates a chunky, bite-sized treat with extra crunch.
- Peanut Bark: Spread a thin layer of melted chocolate on parchment paper, sprinkle it with peanuts, and let it harden. Break it into pieces for a fun, shareable treat.
Themed Creations for Special Occasions
- Holiday Variations: Use red and green sprinkles for Christmas, pastel candy coatings for Easter, or orange and black decorations for Halloween.
- Gift-Ready Treats: Package your chocolate-covered peanuts in clear bags or jars with ribbon and labels for a thoughtful homemade gift.
- Dessert Toppings: Chop the chocolate-covered peanuts and sprinkle them over ice cream, yogurt, or cakes for an indulgent topping.
Incorporating Different Nut Types
While peanuts are the classic choice, don’t be afraid to experiment with other nuts:
- Almonds: Chocolate-covered almonds are a sophisticated alternative with a slightly milder nutty flavor.
- Cashews: Their buttery texture pairs wonderfully with chocolate.
- Hazelnuts: A luxurious option that complements dark chocolate beautifully.
With so many variations to choose from, chocolate-covered peanuts become a canvas for your creativity. Try these ideas to elevate your homemade treats and make every batch uniquely delicious!
Tips for Perfecting Your Chocolate Covered Peanuts Every Time
Crafting the perfect chocolate-covered peanuts at home is an art that combines technique and a little bit of patience. Follow these tips to ensure your treats come out beautifully coated, irresistibly tasty, and perfect every time.
Choose High-Quality Ingredients to get the best Chocolate Covered Peanuts
- Use fresh, roasted peanuts for the best flavor and crunch. If you prefer unsalted peanuts, you can add a pinch of sea salt to the melted chocolate for balance.
- Select high-quality chocolate for a smooth, glossy finish. Baking chocolate, couverture chocolate, or premium chocolate chips work best as they melt evenly and provide superior flavor. Avoid low-grade chocolate with waxy or grainy textures.
Master the Chocolate Melting Process
- Double Boiler for Gentle Melting: Use a double boiler to melt chocolate slowly and evenly, preventing it from overheating or seizing. Stir continuously to maintain a smooth consistency.
- Microwave Tips: If using a microwave, heat the chocolate in 15-20 second bursts, stirring well between intervals. Stop as soon as the chocolate is fully melted to avoid burning.
- Add a Stabilizer: For extra smoothness and shine, mix in a teaspoon of coconut oil or cocoa butter while melting the chocolate. This also helps the coating harden evenly.
Keep Everything Dry
Water is the enemy of melted chocolate. Even a small amount of moisture can cause chocolate to seize, turning it into a grainy, clumpy mess. Ensure all utensils, bowls, and peanuts are completely dry before starting.
Coat Peanuts Efficiently
- Work in small batches to ensure every peanut gets evenly coated.
- Use a fork, slotted spoon, or small tongs to lift peanuts from the melted chocolate, letting excess chocolate drip off before placing them on a prepared surface.
- Stir the melted chocolate frequently to keep it smooth and prevent it from hardening as you work.
Use the Right Surface for Setting
Line a baking sheet with parchment paper or a silicone baking mat to prevent the peanuts from sticking as they cool. This also makes cleanup easier and keeps your chocolate-covered peanuts looking neat.
Temperature Matters
- Ensure your peanuts are at room temperature before coating them. Cold peanuts can cause the chocolate to harden unevenly, while warm peanuts may thin the coating.
- Let the chocolate-covered peanuts set in a cool, dry place or in the refrigerator. Avoid humid areas, as moisture can affect the chocolate’s texture and appearance.
Customize and Decorate Chocolate Covered Peanuts
- Add toppings like sprinkles, crushed nuts, or flaky sea salt immediately after coating while the chocolate is still wet. This ensures they stick well to the surface.
- For a professional look, drizzle a contrasting chocolate (such as white over dark) over the coated peanuts using a piping bag or a ziplock bag with a small corner cut off.
Store Properly
- Once set, store your chocolate-covered peanuts in an airtight container to maintain freshness. Keep them in a cool, dry place or in the refrigerator, especially in warm climates.
- Avoid exposing them to direct sunlight or high heat, which can cause the chocolate to melt or bloom (a white, powdery appearance caused by fat separation).
Practice Makes Perfect Chocolate Covered Peanuts
Don’t worry if your first batch isn’t flawless. With practice, you’ll refine your technique and discover personal preferences for chocolate types, coatings, and toppings.
By following these tips, you’ll create chocolate-covered peanuts that are not only delicious but also visually stunning and perfect for sharing. Your homemade treats will quickly become a favorite among family and friends!
Expert Tips for more details.
Conclusion: Enjoy Your Homemade Chocolate Covered Peanuts
Congratulations! You’ve just unlocked the secret to making perfect chocolate-covered peanuts at home. This delightful snack is a testament to how simple ingredients and a bit of creativity can produce a treat that’s every bit as satisfying as what you’d find in a gourmet shop.
Making chocolate-covered peanuts at home isn’t just about the result; it’s about the joy of the process. From selecting high-quality peanuts and chocolate to experimenting with toppings and decorations, every step allows you to put your personal touch on this classic sweet-and-salty combination. The best part? You get to customize them exactly to your liking, whether you prefer a dark chocolate coating with a sprinkle of sea salt or a festive drizzle of white chocolate.
Homemade chocolate-covered peanuts also come with a host of benefits. They’re free from unnecessary additives and preservatives, making them a healthier alternative to store-bought options. Plus, they’re versatile! Serve them as a party snack, gift them to loved ones, or simply keep them on hand for a quick and satisfying treat.
We encourage you to get creative with your next batch. Try out new toppings, mix in different nuts, or even experiment with flavored chocolates. The possibilities are endless, and each variation offers a fresh way to enjoy this beloved treat.
Finally, don’t keep the magic all to yourself—share your chocolate-covered peanut creations with friends and family. Snap a photo of your masterpiece and tag us on social media or leave a comment on the Cheese n’ Chocolate blog to let us know how your recipe turned out. We’d love to see your unique twists and hear about your experience.
Big thanks for hopping on this tasty ride with Luna! Stay tuned for more fun and indulgent recipes from Cheese n’ Chocolate. Until next time, happy snacking and keep spreading the love of chocolate and creativity!
If you loved making chocolate-covered peanuts, don’t miss our guide on How to Make Perfect Chocolate Covered Almonds at Home! to discover another delightful recipe that’s just as easy and delicious!
3 thoughts on “How to Make Perfect Chocolate Covered Peanuts at Home”